Visualize Your Browsing Paths
Journey Tracker captures your research sessions as interactive branching trees. See how tabs spawn new tabs, tag important findings with colors, add notes, extract page data, and export everything as HTML or JSON.

Everything You Need to Track Research
Tree Visualization
See your browsing journey as an interactive branching tree. Main paths flow vertically while new tabs branch horizontally, showing exactly how your research evolved.
Multiple Journeys
Create separate journeys for different research sessions. Switch between them, rename for organization, and keep your investigations cleanly separated.
Site Favicons
Instantly identify sites with their favicon displayed next to each step. Visual landmarks help you scan your journey and spot familiar domains.
Color Tagging
Mark important steps with 6 colors: red, orange, yellow, green, blue, or purple. Tagged steps stand out in the tree and carry their colors into exports.
Notes & Markdown
Add rich notes to any step using Markdown. Support for bold, italic, code, links, lists, and blockquotes. Notes appear inline and export with your journey.
Time Tracking
Every step records its timestamp. See total journey duration, pause tracking during breaks, and resume when you're ready. Multi-day journeys supported.
Content Extraction
Automatically extract structured data from pages using CSS selectors. Configure custom extractors for Jira tickets, GitHub issues, or any site you research.
Import & Export
Export as a styled HTML file or portable JSON. Import JSON journeys to continue research across browsers. Includes the full tree, notes, colors, and extracted data.
Privacy First
All data stays local in your browser. No external servers, no tracking, no analytics. Your browsing history remains completely private on your device.
Getting Started
Install the Extension
Visit the Chrome Web Store and click "Add to Chrome". The Journey Tracker icon will appear in your toolbar.
Start Browsing
Journey Tracker automatically records your navigation. Open links in new tabs (Ctrl+Click or right-click) to create branches in your journey tree.
View Your Journey
Click the toolbar icon to open the side panel — a persistent view that stays open while you browse, showing your journey tree in real time.
Tag, Note, and Export
Hover over any step to add color tags or notes. When you're done, click Export to save your journey as a standalone HTML file.
User Manual
Deep dive into every feature of Journey Tracker.
Site Favicons
Each step in your journey displays the site's favicon next to the page title. These visual markers help you quickly scan your journey and identify familiar domains at a glance.
How It Works
- Favicons are fetched automatically when a page is recorded
- If a site doesn't have a favicon, a default icon is shown
- Favicons appear in the side panel and in exported journeys
- Exported journeys include favicons for offline viewing
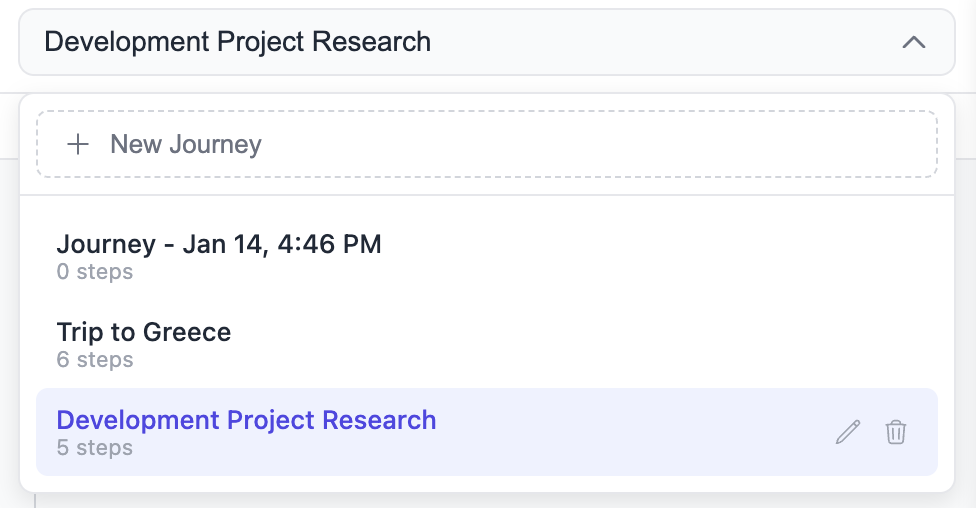
Multiple Journeys
Keep your research sessions organized by creating separate journeys. Each journey maintains its own tree, notes, and tags.
Managing Journeys
- Create: Click the dropdown at the top and select "New Journey" to start fresh
- Switch: Use the dropdown to switch between existing journeys
- Rename: Click the pencil icon next to the journey name to give it a descriptive title
- Delete: Remove a journey entirely (with confirmation to prevent accidents)
Journeys are named automatically by date and time. Rename them to something meaningful like "API Documentation Research" or "Bug Investigation #1234".
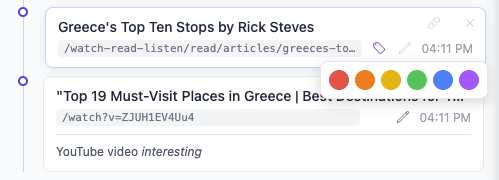
Color Tagging
Mark important steps with colors to highlight key findings, categorize pages, or create visual landmarks in your journey.
Available Colors
How to Tag
- Hover over any step in the tree
- Click the tag icon that appears
- Select a color from the picker
- Click the same color again to remove it
Tags persist across sessions and are included when you export your journey.
Notes & Markdown
Add rich notes to any step using Markdown formatting. Notes appear inline in the tree and are included in exports.
How to Add Notes
- Hover over any step in the tree
- Click the pencil icon that appears
- Type your note using Markdown
- Press Ctrl+Enter or click outside to save
Supported Markdown
**bold** → bold
*italic* → italic
`code` → code
[link](url) → clickable link
- item → bullet list
1. item → numbered list
> quote → blockquote
Search & Filtering
Use the search box at the top of the side panel to filter your journey in real-time.
What Gets Searched
- Page URLs: The full URL of each visited page
- Page titles: The title shown in the browser tab
- Extracted data: Any data pulled by content extractors
Search is case-insensitive. Only matching steps are shown, but the tree structure is preserved to maintain context.
Time & Duration Tracking
Every step records its timestamp. The stats bar shows your total journey duration, which updates in real-time.
Timestamps
- Short format shows time only (e.g., "2:34 PM")
- Hover over the timestamp for the full date and time
- Useful for multi-day research sessions
Pause & Resume
Click the pause button in the bottom bar to stop tracking. The timer freezes and unrelated browsing won't be recorded. Click again to resume from where you left off.
Stats Bar
The stats bar displays step count, unique domain count, and total duration. Hide it from settings if you prefer a cleaner view.
Removing Steps
Made a wrong turn? Remove unwanted steps from your journey to keep it clean and focused.
How to Remove
- Hover over the step you want to remove
- Click the X icon on the far right
- The step is immediately removed and stats update
Note: Removing a step doesn't affect its child branches. Children become orphaned and appear at the root level.
Drag-and-Drop Reordering
Rearrange steps in your journey by dragging them to new positions. Perfect for organizing your research into a logical flow.
How to Reorder
- Click and hold the node dot (the circle on the left side of any step)
- Drag the step to your desired position
- Release to drop it in place
Reordering Rules
- Same depth only: Steps can only be reordered among siblings at the same depth level
- Automatic numbering: Position numbers recalculate automatically after reordering
- Preserves hierarchy: Child branches move with their parent step
This is useful when you want to present your research in a different order than you actually browsed, or when organizing steps for export.
Tracking Modes
Control how Journey Tracker captures your browsing with three tracking modes, accessible from settings.
Track All
Records every page you visit automatically. The default mode for comprehensive journey tracking.
Allowlist Only
Only records pages matching your configured domain rules. Perfect for focused research on specific sites.
Manual Only
No automatic tracking. Only pages you explicitly add with the + button are recorded. Maximum control.
Manual Page Addition
Regardless of your tracking mode, click the + button in the bottom bar to manually add the current page to your journey. This works even while tracking is paused, giving you full control over what gets recorded.
Switch modes anytime from the settings panel. Your existing journey data is preserved when switching.
Content Extraction
Automatically extract structured data from pages using CSS selectors. Configure custom extractors for any site you research regularly.
How It Works
- Extracted fields appear below the step title in your journey tree
- Click the chevron to expand or collapse extracted data
- Collapsed state persists across sessions—your preferences are remembered
- Data is searchable—find steps by extracted field values
Re-extract Data
When viewing a step whose tab is still open, a refresh icon appears. Click it to re-extract the page data—useful when the page content has changed (e.g., a Jira ticket status was updated). The new data replaces the old.
JSON Configuration Schema
Extractors are defined as JSON objects. Access the editor from settings under "Domain Rules" → "Edit Rules JSON".
{
  "id": "unique-identifier",
  "name": "Display Name",
  "domain": "*.example.com",
  "pathPattern": "/path/*",
  "extract": true,
  "fields": [
    { "label": "Field Name", "selector": "CSS selector" }
  ]
}
Schema Reference
| Field | Type | Required | Description |
|---|---|---|---|
| id | string | Yes | Unique identifier for this extractor |
| name | string | Yes | Display name shown in the extension settings |
| domain | string | Yes | Domain pattern. Supports * wildcard (e.g., *.atlassian.net) |
| pathPattern | string | Yes | URL path pattern. Supports * wildcard (e.g., /browse/*) |
| extract | boolean | No | Enable/disable extraction. Defaults to true if fields are defined |
| fields | array | Yes | Array of field definitions to extract |
| fields[].label | string | Yes | Display label for the extracted field |
| fields[].selector | string | Yes | CSS selector to target the element. Uses document.querySelector() |
Wildcard Patterns
Both domain and pathPattern support the * wildcard, which matches any characters.
Domain Examples
*.atlassian.netmatchesmycompany.atlassian.net,test.atlassian.netgithub.commatches exactlygithub.comportal*.example.commatchesportal-us.example.com,portal2.example.com
Path Examples
/browse/*matches/browse/TICKET-123,/browse/PROJ-456/*/issues/*matches/owner/repo/issues/123/*or*matches any path
Example Extractors
GitHub Issues
{
  "id": "github-issues",
  "name": "GitHub Issues",
  "domain": "github.com",
  "pathPattern": "/*/issues/*",
  "extract": true,
  "fields": [
    { "label": "Title", "selector": ".js-issue-title" },
    { "label": "Author", "selector": ".author" },
    { "label": "State", "selector": ".State" }
  ]
}
Jira Tickets
{
  "id": "jira-ticket",
  "name": "Jira Ticket",
  "domain": "*.atlassian.net",
  "pathPattern": "/browse/*",
  "extract": true,
  "fields": [
    { "label": "Status", "selector": "[data-testid='issue.views.issue-base.foundation.status.status-field-wrapper']" },
    { "label": "Assignee", "selector": "[data-testid='issue.views.field.user.assignee']" },
    { "label": "Priority", "selector": "[data-testid='issue.views.field.priority']" }
  ]
}
Amazon Products
{
  "id": "amazon-products",
  "name": "Amazon Products",
  "domain": "*.amazon.com",
  "pathPattern": "/*/dp/*",
  "extract": true,
  "fields": [
    { "label": "Product", "selector": "#productTitle" },
    { "label": "Price", "selector": ".a-price-whole" },
    { "label": "Rating", "selector": "#acrPopover" }
  ]
}
Finding CSS Selectors
- Open Chrome DevTools (F12 or right-click → Inspect)
- Use the element selector tool (cursor icon) to click on the data you want
- In the Elements panel, right-click the highlighted element
- Choose "Copy" → "Copy selector" for a CSS selector
- Alternatively, look for unique
id,class, ordata-*attributes
Tip: Prefer data-testid or id attributes over class names, as they're less likely to change.

Import & Export
Export your journeys as styled HTML files for sharing, or as JSON for backup and portability. Import JSON journeys to continue research across browsers or devices.
Export as HTML
Generate a standalone HTML file that opens in any browser with no dependencies or internet required.
- Complete tree visualization with all branches
- All notes rendered with Markdown formatting
- Color tags displayed on tagged steps
- Extracted data from content extractors
- Timestamps, duration, and statistics
- Clickable links to original pages
- Self-contained CSS styling
Export as JSON
Save your journey as a portable JSON file containing the full tree structure, notes, tags, and extracted data. JSON exports can be imported back into Journey Tracker on any browser.
Import a Journey
Open the journey dropdown and click "Import JSON" to load a previously exported journey. Imported journeys automatically backfill extracted data when matching domain rules are configured — so you can import a journey on a different machine and still get extraction results.
How to Export
- Click the Export button in the bottom action bar
- Choose "Export HTML" for a shareable document or "Export JSON" for a portable backup
- Choose where to save the file
HTML exports are perfect for sharing with colleagues. JSON exports are ideal for backups, moving between browsers, or archiving journeys for later import.
Your Data Stays Local
Journey Tracker stores all data locally in your browser. Nothing is sent to external servers—your browsing history stays completely private.
Local Storage Only
All journeys, notes, and settings are stored in Chrome's local storage on your device.
No Tracking
No analytics, no telemetry, no data collection. We don't know what you browse.
Read our full Privacy Policy for complete details.
Ready to Track?
Start Mapping Your Research
Install Journey Tracker and never lose track of your browsing again. Free and open source.
Install from Chrome Web Store